Posted by
cynd11
USA
Joined Nov 8, '15
Some of you may remember the teaser I posted a few days ago about miter cuts on the Glowforge. I finally scraped together enough “me” time to finish the project. I’ve been working on it a long time! (@marmak3261 saw parts of it when he visited last week). First, the finished project, then I’ll show the progress photos in case anybody is interested in trying something similar.


Total height is 4.25" and the “stained glass” panels are 2" each side including the walnut corners. This tiny lamp is an exact copy of a full size one I made that stands about 10-11" tall and is made of real stained glass. The design is my own.
Here are the two lamps:

I cut the stained glass panels from white Proofgrade acrylic, and engraved the lead lines. While the material was still masked I smeared on some Heidi Swapp Metallic Black embossing paste and let it dry. It looked a lot better than one I tried with the leadline applicator from the stained glass paint set–less gloppy. After it dried I pulled off the mask and painted the flowers and leaves with stained glass paint.
I got the walnut 1/8" square dowels at the local craft store but I could easily have cut them on the Glowforge. I cut them to size and glued them in place with Epoxy330 and a miter clamp. That was tricky, let me tell you!
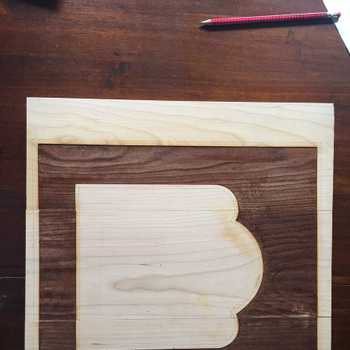
Speaking of tricky, here is how I cut the miters: I created a jig from scrap maple plywood that consisted of a right triangle with two 45 degree angles. Here’s what it looks like:

The tall piece is the piece of Proofgrade 1/8" walnut hardwood to be miter cut. It leans on the jig at a 45 degree angle and the laser cuts straight down on the edge (by lining up a cutline in the GFUI visually, with the cut placed just below the camera):

So with miter cuts in the Glowforge, you can make the sides of a box as tall as the length of the bed, but you are limited to only about 2" on a side (about 2.3" before miter cutting) for each side. Fortunately that worked perfectly for my little lamp.
Here’s all the parts (not including the “glass”):

The mitered exterior really fit together nicely:

Put it all together. The stained glass part rests on the engraved shelf in one of the square pieces, and the little plastic votive fits tightly without gluing into the circular holes. Here’s a look down the top:

And the underside:

If you try something like this, I advise you to cut the mitered box first, then you can adjust the sides of the square parts to fit it; it’s a lot easier than the opposite way.

Start with an idea. Create your design. Hold something in your hand you only imagined an hour ago. Glowforge makes that possible.

From idea to design to creation. No matter what you want to make your Glowforge can help you make it happen.