Posted by
Jules
Third ball from the sun.
Joined Jan 20, '16
This was an interesting little project, and I learned an awful lot of what not to do along the way. 
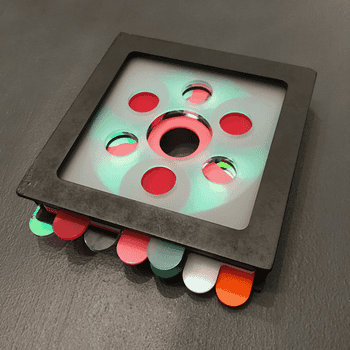
I created a little pattern last week for some inlay and to see if kerf adjusting the design worked - couldn’t figure out what to do with it, and finally settled on making a little jewelry tray - the kind that Southern gals keep above the sink to hold their jewelry while doing the dishes or talking on the phone. (I don’t know, Northern gals might do the same thing…my mom has always had one next to the sink, and since she’s into bling, she’ll probably get this one.)
So anyway, dug out the mirrored acrylic scraps, cut a few copies of the pattern, and came up with this:
(And I apologize for my absolutely lousy photography - they actually look a lot better IRL but I can’t seem to catch the reflection effects with a camera.)
What I learned along the way:
1. Kerf adjusting your design works extremely well.
Each one of those tiny tiles was press fit into the backing, and is not glued down, with the exception of the tiniest slivers in two of the corners. (If I hadn’t glued a backing onto it, I could change that design.)
2. Extremely accurate kerf adjusting was the biggest mistake I made.
Because… each of those little tiles actually fits correctly in only one place…the place that corresponds to it’s place on the matrix!
Yikes!
3. I didn’t figure out how to lift the cut tiles (mostly) intact off of the grid until the last blessed set!
The answer is to use duct tape to lift all the little bits. (Other kinds of tape aren’t sticky enough to catch them all, and you’re still going to lose a few down the holes when they’re this size.)
So I spent a day or two picking up each of those little tiles and trying them in each slot. (I can be stubbornly stupid at times.)
4. Focal point selection makes a difference in acrylic, and this is only 1/8th inch thick.
All of the little sides of the tray and the black box show a slight difference from top to bottom, and that is because the focal point was set at the base of the acrylic. If it is set in the center, there will be a different profile on it, but it will still be uneven. That makes it hard to stack layers and get a uniform profile…it has a ridged look. (There’s a lot more experimenting to be done there.)
5. Solvent glue and I do not get along.
Don’t get any on your fingers and touch any part of the glossy box while you are trying to stick the layers together. (You will trot out every cuss word you know…twice.)
6. If you’re going to do something like this…for the sake of your sanity…design your tiles bigger. Chuckle!
The Glowforge did just fine… operator competence however…TBD. 
Pizza break!


Start with an idea. Create your design. Hold something in your hand you only imagined an hour ago. Glowforge makes that possible.

From idea to design to creation. No matter what you want to make your Glowforge can help you make it happen.