Posted by
rachael
Joined Dec 31, '15
I stayed pretty late last week at Laser Thursday but my husband and daughter didn’t join me. When I came home she was unfortunately still awake and asked if I’d made any owls for her – she’d mentioned making “laser owls” repeatedly. I told her hadn’t because I made some picture frames for family (similar to what you may have seen in Maker Faire pictures). She replied: “you need to go back to work and laser some owls.” No really.
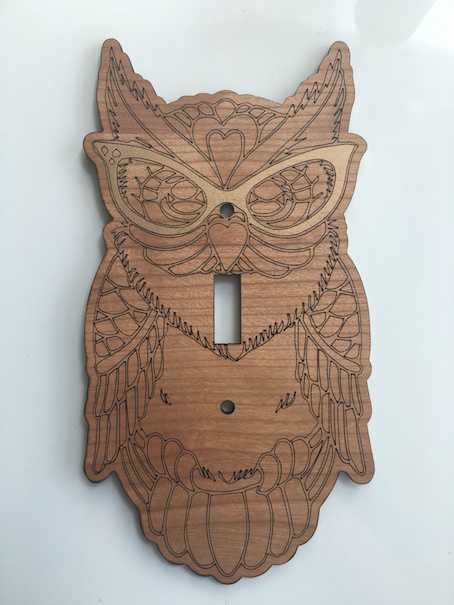
Last night we decided to make that happen. We were browsing Pinterest for ideas and found some light switch plate covers made of wood and shaped like owls. My husband and I realized we could do that! Easy! What is a kid’s bedroom without awesome decoration? First we looked up the dimensions for standard light switch plate covers and made a simple template for that.
Then, since neither of us is an artist, we looked through Google image search for black and white owls that have licenses that allow re-use (e.g. creative commons). We found this nerdy owl picture on Flickr by Adrianna Battista that we both liked and was proportioned well to cover a rectangular hole. I first tried “tracing” it in Illustrator to make a vector version of it, but the background color is not actually white which made Illustrator unhappy and led to a lot of weird stray lines. So I opened the jpg in Gimp to change the background color transparent (after a bit of hair pulling and googling for how). I exported that as a png and pulled it back into Illustrator and converted it to a vector drawing.
Next I resized the vector version of the owl until it was bigger than the standard switch plate would be, aligning the switch and screw hole cut-outs to somewhere not too ugly. I originally just made a bigger rectangle around it to cut out but @Shell showed me how to duplicate the vector drawing and do some pathfinder magic to get a second vector outline just a bit bigger than the main drawing. I also learned a bit about cleaning up stray duplicate paths as somewhere along the line we had a bunch of extra ones!
Off to the Glowforge to print! I set the main vector drawing of the owl to engrave in “score” mode along the vector paths which cuts a line that doesn’t go all the way through the material. The rest of the main sets of paths – the switch and screw holes and outline – were just set to cut all the way thru. The material that Shell suggested I use was maple veneered plywood with a top coat. She also had the idea of peeling off the tape only along the glasses and spray painting that gold, then peeling the rest of the tape off. The result:
This was a pretty simple and fast project, even for me who is not very good with drawing programs of any kind. Hopefully I got the measurements right. More importantly, hopefully the toddler likes it. 

Start with an idea. Create your design. Hold something in your hand you only imagined an hour ago. Glowforge makes that possible.

From idea to design to creation. No matter what you want to make your Glowforge can help you make it happen.