
Posted by
evansd2
Joined Sep 18, '17
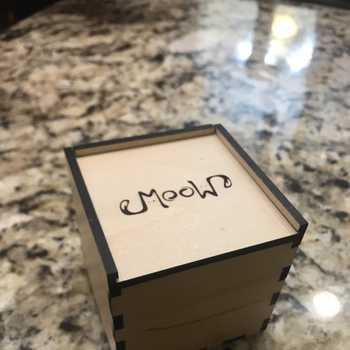
Hi! I’m box.

I wanted to make a hero vault that would fit inside my dice tray (scroll down in that post for the dice tray pics) and match it thematically. This is where I ended up.
Notes:
Onto the fun stuff!
The lid is inlaid and engraved, and finished with danish oil. The top was assembled first, the inlay is full cutouts, not veneer in pockets.

Now you see the sides, they are wrapped in veg-tan sheepskin (From Tandy, I don’t know the weight, it comes in at 0.07" thick). I find that the waterstain tends to curl and shrink the leather, as well as toughen it up. So, I first stained it and let it thoroughly dry while it was clamped curled into a cylinder shape. The cylinder curve prevented the bulk of the natural curling you would get otherwise. Sadly I didn’t take any pictures of that process, but if you ever do this you’ll find out what I mean really quickly.

Detailed view of the sides. The leather is glued into place using contact cement, which has a little play to get it just right for the first couple of minutes. Once it sets, though… if you want to adjust the position it’ll rip your leather in half before it gives up. Guess how I know that? Let’s just say I’m glad I cut a couple of spare leather strips.

The problem with boxes of this size is that the circumference grows very quickly. Unfortunately, it’s too large to do a single strip of leather around the box (about 22.5" (570mm), well over 19.5" – can’t even fit on the diagonal), so I had to do two strips and join them as cleanly as I could. Each of the short sides has a seam that is subtly decorative. I wanted it to be simple but intentional; this is where I ended up.

The inside of the box is designed to be a “hero vault” for D&D. Yes, I’m a big geek, but you knew that already. This style of box, of course, could be made into anything. If you look closely, you can see how I constructed the box with layers. The middle layers are Baltic birch plywood, all visible surface layers are maple. The box is made with symmetrical lid and base, each constructed of a total of 7 layers. 5 layers of BB ply sandwiched between maple layers.

A head-on view of the layout. You can’t see how it’s fully constructed by there are registration holes that accepted a dowel directly under the magnets and 2 more in the lower corners, making a total of six registration dowels. This kept the BB layers properly aligned for gluing. Six dowels may have been overkill but other boxes I’ve made with two felt like it wasn’t enough. And yes, I cut my dowels to length using the glowforge, of course. Saws are for suckers.
Now a few views of it filled up with intended items. The headliner is glued in with rubber cement, and all is double layered. That works out to about 0.3" (8mm), which is enough thickness to gently “trap” the pencil and the miniature.

While you can’t see why, you might notice that the foam in the pen compartment sits a bit higher than the others. That’s because one of the BB layers (the second from bottom) is cut without the pen cavity. This makes a false bottom which raises the pen up enough (2 layers of BB) so that it’ll be properly cushioned and easy to remove.

Maybe red/purple swirl dice would complement the padauk? Yes, I have a lot of dice. Yes, I know, shush.

Final thoughts:
It’s a labor-intensive construction method, but the results are pretty impressive in person. If I were going to do it again, I would probably oil the visible wood surfaces and the leather before gluing them to the box. As it stands, I dyed and dried the leather, sanded the visible surfaces, then glued everything together, and oiled everything last. The side effect of this was that I had to be careful not to get danish oil on the leather and not to get leather creme on the wood.
My main reasoning was that I didn’t know if the creme would change the size of the leather… would it swell up? If it did my fit was completely blown. I don’t know, this is one of those cases where a shortcut might be a bad idea. I’m sure someone out there has done something like this and is saying “Dave, you dummy” right now, but hey, it all worked out 
Go forth and make stuff!

Start with an idea. Create your design. Hold something in your hand you only imagined an hour ago. Glowforge makes that possible.

From idea to design to creation. No matter what you want to make your Glowforge can help you make it happen.