
Posted by
steph
Alexandria, VA
Joined Oct 19, '15
Alternatively titled, “My Ridiculously Delayed I’ve Got a Glowforge! Post”
Thanks to Instagram, a small handful of people already know I received my Glowforge back in late June. Sadly the real world intervened as soon as it came, so I never had the time to do much more than quick little projects …until now!
(shameless plug- you can see those projects on my instagram if you’re interested  )
)
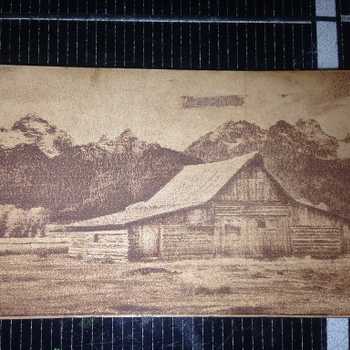
I decided to finally take the leap into photo engraving. The photo is a shot of the Vatican from my first trip to Italy, and despite the numerous (and sometimes frustrating) test engraves, the final result came out way better than I was expecting. For starters, I ran a basic automagic dark engrave (roughly 3"x4") on proofgrade maple plywood with very little editing done to the photo:

Not even that terrible! Overall too grainy for me, though, so back to Photoshop for a little contrast boost and then back, and back, and back again to the laser…

What I began to realize was that rather than messing with the laser engrave settings, I needed to mess more with the photo. To be honest, I’m not a huge fan of trying to perfectly replicate a photo with a laser…I didn’t like how my early tests engraved the entire surface. Going between Photoshop and Illustrator led me to create a new version of my photo that was a little more pop-arty. It only has 2-3 shades of grey for all the shadows, no gradients, and pure white for everything else- meaning those areas wouldn’t be engraved. After that, it became a matter of how dark I wanted my greys to be and how much of the smaller details I wanted to preserve. Going back to using the automagic proofgrade dark engrave, I came up with my top two (the left in  cherry ply, the right in maple)

Finally, using the two tests above, I was able to edit the photo to preserve more of the detail in the dome but still keep the engrave levels to a minimum. The end engraving is 5"x7" and I even made a quick little stand for it. Overall, my favorite effect is how the sky came out! This definitely won’t be the last time I use this photo…I already have a new project planned to try and give the engraving a little more pop 


Start with an idea. Create your design. Hold something in your hand you only imagined an hour ago. Glowforge makes that possible.

From idea to design to creation. No matter what you want to make your Glowforge can help you make it happen.